DIY - Lighted Paper Snowflake Wreath
We
figured we would end with a treat as Laura has not only one but two
projects to share today. The first is an incredibly gorgeous Lighted
Paper Snowflake Wreath. It's a winter wonderland all in itself created
with delicate snowflakes and cones made of all from paper. Laura is also
sharing super cool Mason Jar Snow Globes as well. Please welcome our
final guest in this series, Laura.
I am thrilled to be finishing off the Handmade Holidays featuring STYROFOAM™ Brand Foam series here at Under The Table and Dreaming. Last, but not least... right? Seriously though, there have been some AMAZING project this week.
Today I want to share with you my winter wonderland wreath.

You are going to need:


I also used STYROFOAM™ Brand Foam to make the mason jar snow globes.

Thank you so much for the chance to share with all of you today.
I am thrilled to be finishing off the Handmade Holidays featuring STYROFOAM™ Brand Foam series here at Under The Table and Dreaming. Last, but not least... right? Seriously though, there have been some AMAZING project this week.
Today I want to share with you my winter wonderland wreath.

You are going to need:
A
STYROFOAM™ Brand Foam wreath (I used an 18" wreath because I wanted it
big, but that size was a beast, so you may want to use a 12" wreath, it
goes a lot faster.)
A pack of white card stock (about 50 sheets)
A 3" scalloped circle paper punch
Cut out paper snowflakes (I used my silhouette to cut them out)
A small strand of white Christmas lights
berry sprigs
2 packs of dollar store snow flakes
little pine cones
glitter blast diamond dust spray paint
glue gun and glue

Wrap
your Christmas lights around the wreath. Easy enough so far. You may
notice the computer in the back ground. Yes, this is a watch a move
while you do it kind of project. Also you will see I pressed the
plugie-ine end of the lights into the wreath so it is all nice a tucked
away. If you are planning on hanging this somewhere where it will not
be easy to plug it in you may want to get those battery powered lights.
Before it is too covered in paper tie a ribbon or whatever you are planning to hang it with on the top.
Before it is too covered in paper tie a ribbon or whatever you are planning to hang it with on the top.

Next
I attached the snowflakes to the lights. I cut them down the middle
and them glued the two open sides together so it kinda makes a cone
shape. Oh and I would like to point out that you do not need to worry
about the lights catching the paper on fire. Paper burns at 451 degrees
and little Christmas lights will not get anywhere near that hot.

Next
I glitter blasted the pine cones and glued them on around the wreath.
Sorry I forgot to take pictures of this part, but I have faith that you
guys can do it with out them.
Next make your cones.
Next make your cones.

You
are going to need A LOT of cones. Like 300+ cones. I like to make
some skinny and some fat and some short and some long. So just make all
kinds. Also I make the cones as I go, but you can make 300 first and
put them on. Just put a dab of glue on the point and press it into the
STYROFOAM™ Brand Foam.

I
also glued on plastic and paper snow flakes as I go. I laid some right
on top of the wreath and then I broke a few and stuck them in.
keep going until the whole thing is covered.
And you are done. YAY!
keep going until the whole thing is covered.
And you are done. YAY!

Hang it on the door.

or inside.

I love wreaths as part of a Christmas vignette.
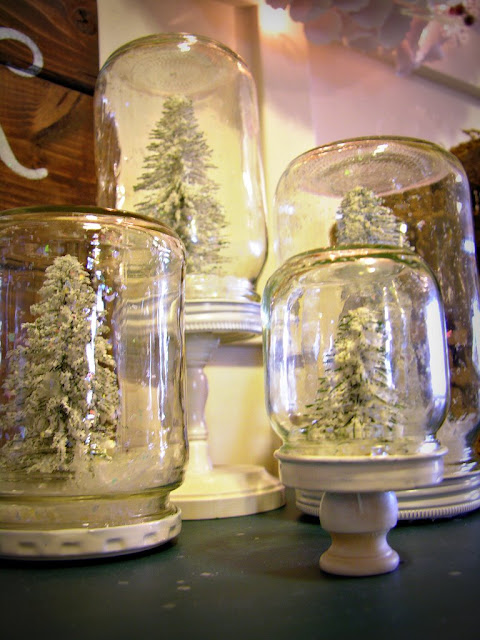
I also used STYROFOAM™ Brand Foam to make the mason jar snow globes.
They are super easy.

When
I thought of the snow globes I totally thought I was being so original
and then low and behold Anthropologie totally stole my idea. But mine
are better than theirs because mine are on the cute little stands and
mine were $18 for 5 and theirs were $18- $30 EACH. Okay, get yourself
some jars. (they are like .25 at thrift stores.) I also used a baby
food jar. It is so cute. To make the bases just get little wood disks
and candle stick things. Glue them together and to the top of the jar
lids, then spray them white. I got the trees at the dollar store. Cut a
STYROFOAM™ Brand Foam ball to put the trees on inside the jars. Glue
the STYROFOAM™ Brand Foam disk to the base and the tree to the disk. To
make the snow I used a little iridescent snowflakes for a craft store
mixed with snow I made by rubbing two pieces of foam together. Put a
little snow in the jar screw it on the the base, shake it around and you
have snow globes.

I just love them.
Thank you so much for the chance to share with all of you today.
DIY - Lighted Paper Snowflake Wreath
 Reviewed by trapatouni
on
3:52 AM
Rating:
Reviewed by trapatouni
on
3:52 AM
Rating:
Reviewed by trapatouni
on
3:52 AM
Rating:


